Istio Installation
In this tutorial, we are going to discuss about how to do the installation of Istio. Already within my system I have minikube up and running.
I’m going to use the same system to do the installation of Istio. The installation of Istio in entire production grade cluster we will be see it later point of time now.
I’m going to use this specific system and do the installation of Istio. Before doing the installation make sure you have enough resources like minimum 4GB of RAM and 20 GB of hard disk.
Now let me go ahead and do the installation. As a part of the Istio documentation, we do have the command on how to start with the installation.
root@cluster-node:~# curl -L https://istio.io/downloadIstio | sh -This particular script automatically it’s going to pick the required downloadable from the download page or in case if I wanted any specific release I can use the release that I wanted.
At the time of this tutorial the latest release is 1.10.0. So I will be providing that specific release, in case if I doesn’t provide this automatically its going to pick the latest one and do the installation.
So this is going to pick the right version and download. Istio is available as a part of this specific folder Istio-1.10.0. Now I need to add the directory Istio-1.10.0/bin as a part of the environmental variable. So I will be adding that as a part of the path. Now let me go ahead and add the path as a part of the profile file.
root@cluster-node:~# cat .profile
~/.profile: executed by Bourne-compatible login shells.
if [ "$BASH" ]; then
  if [ -f ~/.bashrc ]; then
    . ~/.bashrc
  fi
fi
mesg n 2> /dev/null || true

export PATH="$PATH:/root/istio-1.10.0/bin"
After making the change let me go ahead and source this particular file so that the latest changes will get reflected source and then the profile file.
root@cluster-node:~# source ~/.profileAfter that, I will be doing the verification of Istio whether the installation went through fine or not.
root@cluster-node:~# istioctl x precheck
✔ No issues found when checking the cluster. Istio is safe to install or upgrade!
  To get started, check out https://istio.io/latest/docs/setup/getting-started/
root@cluster-node:~# istioctl
Istio configuration command line utility for service operators to
debug and diagnose their Istio mesh.
Usage:
istioctl [command]
Available Commands:
admin Manage control plane (istiod) configuration
analyze Analyze Istio configuration and print validation messages
..............
..............
..............Install Core Components
Now, let me go ahead and do the installation using the demo profile. So that all the features will be available. As a part of the documentation I do have the instructions on what are all the different type of profiles available.
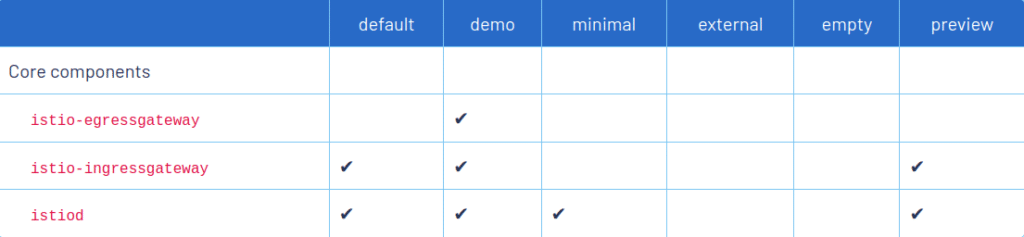
Here default, demo, minimal, external, empty and preview. And if I go for the demo, I will be having all the core components.
To further customize Istio, a number of addon components can also be installed. Refer to integrations for more details.
So I’m going to do the installation using the profile as demo. Let me go ahead and do the installation.
root@cluster-node:~# istioctl install --set profile=demo
This will install the Istio 1.10.0 demo profile with ["Istio core" "Istiod" "Ingress gateways" "Egress gateways"] components into the cluster. Proceed? (y/N) y
✔ Istio core installed
✔ Istiod installed
✔ Ingress gateways installed
✔ Egress gateways installed
✔ Installation complete                                                                                                                                                      Thank you for installing Istio 1.10.  Please take a few minutes to tell us about your install/upgrade experience!  https://forms.gle/KjkrDnMPByq7akrYA
So it will do the installation of all the core components.
Enable the Istio injection
The Istio installation is good. Now for the Istio to work, I need to enable the Istio injection for the name space default.
root@cluster-node:~# kubectl label namespace default istio-injection=enabled
namespace/default labeled
So it’s going to add this specific label that is istio-injection=enabled as a part of the namespace default. This is very, very crucial step. And please do make sure this particular label does exist in the name space where you are going to try out the Istio.
And as a part of the Istio downloadable I do have a folder called samples where I do have all the sample yaml file.
root@cluster-node:~/istio-1.10.0# ls
bin  LICENSE  manifests  manifest.yaml  README.md  samples  tools
Here I’m going to use this specific sample yaml file to try out various features available as a part if Istio.
Example
Let me go ahead and do the installation of the book info sample. Let me get into the samples. Here I do have lots of demo. Almost for all the features I do have the demo. Within this I do have a folder called a book info which is going to have a small application.
Let me go ahead and do the installation. Don’t worry about the functionality of this specific application. We will have a quick overview in the next tutorial before getting into the demo.
This is just a quick test on whether the application is working fine after doing the installation. So I’m going to use the command kubectl apply -f and then within samples/bookinfo/platform/kube/bookinfo.yaml
root@cluster-node:~/istio-1.10.0# kubectl apply -f samples/bookinfo/platform/kube/bookinfo.yaml
service/details created
serviceaccount/bookinfo-details created
deployment.apps/details-v1 created
service/ratings created
serviceaccount/bookinfo-ratings created
deployment.apps/ratings-v1 created
service/reviews created
serviceaccount/bookinfo-reviews created
deployment.apps/reviews-v1 created
deployment.apps/reviews-v2 created
deployment.apps/reviews-v3 created
service/productpage created
serviceaccount/bookinfo-productpage created
deployment.apps/productpage-v1 created
That’s going to create all the services, deployment and all the resources required for this particular application to work. I can get What are all the resources running as a part of this specific system using the command
root@cluster-node:~/istio-1.10.0# kubectl get all --all-namespacesHere this is the application that we installed just now. This commands displays number of PODs running, deployments, replicasets and services.
So all the pods and deployments are up and running. The application that we just installed and all PODs are up and running.
And we can use another command called istio analyze to make sure there are no validation errors as a part of the installation.
root@cluster-node:~/istio-1.10.0# istioctl analyze
✔ No validation issues found when analyzing namespace: default.
Summary
This is a quick test on how to do the installation of Istio and enable istioctl command by adding it as a part of the path. Also we went ahead and did the installation of the bookinfo sample application and verified the pods whether its able to execute.
Very very important command as a part of enabling Istio is adding istio-injection=enabled label as a part of the namespace that we’re going to use.
In our case, We are going to use the default namespace. So we went ahead and added as a part of the default namespace.
We will be discussing in detail why this particular label needs to get added and why it is crucial and important for Istio to work in the later tutorial.
Now we do have the minikube and Istio installed. We can go ahead and discuss various features available and start using Istio.