Kubernetes Namespaces
Namespaces are Kubernetes objects which partition a single Kubernetes cluster into multiple virtual clusters. Namespaces allow you to group objects together so you can filter and control them as a unit.
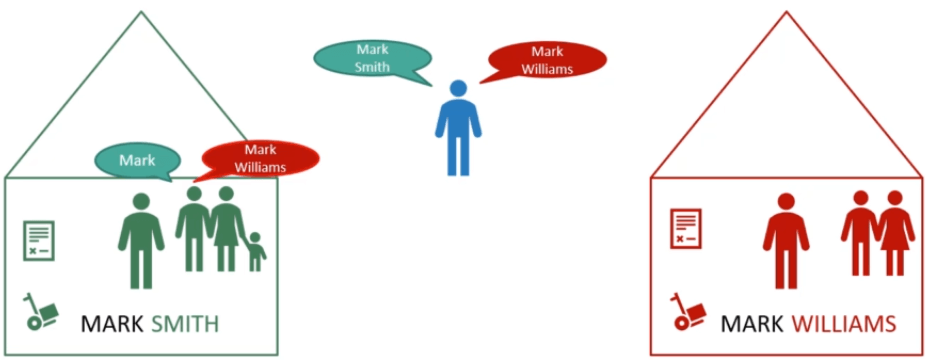
Let us begin with analogy, there are two persons with name Mark. To differentiate them each other we call them by using their last names. Smith and Williams. They come from different houses. There are other members in the house.
The individuals within a house addressed each other simply by their first name. For example, The Father address Mark. However if the father wishes to address the Mark in the other house, he would use the full name.
Someone outside of these houses would also use the full name to refer to the persons or any one within these houses. Each of these houses have their own set of rules that defines who does what. Each of these houses have their own set of resources that they can consume.
Now lets get back to Kubernetes. These houses correspond to Namespaces in Kubernetes. Whatever we discussed in previous tutorials such as PODs, Deployments, Services etc in our cluster, are created within these Namespace. This Namespace is known as default Namespace and it is created automatically in a Kubernetes when the cluster is first setup.
Kubernetes creates a set of PODs, Services, Deployments for its internal purpose such as those required by the network solution, the DNS service etc. To isolate these from the user and prevent you from accidently deleting or modifying the services, Kubernetes create them under another Namespace when the cluster startup named with Kube-system.
The another Name-space created by Kubernetes automatically is called kube-public. This is where resources that should be made available to all users that are created.

You can create your own Namespace as well. For example, if you want to use the same cluster for both development and production environments, but at the same time isolate the resources between them. You can create a different Namespace for each of them. That way while working with dev environment you don’t accidentally modify the resources in production. Each of these Namespaces have its own policies defined who can do what.
You can also assigns limits of resources to each of these Namespaces. That way each Namespace is guaranteed that a certain amount of resources and doesn’t use more than its allowed limit.
Going back to the default Namespace that you are working on, just like how the members with in a house refereed to each other by their first names, the resources within a Namespace can refer to each other simply by their names.
You can connect other Namespace resources by appending the name of the Namespace to the name of the service.
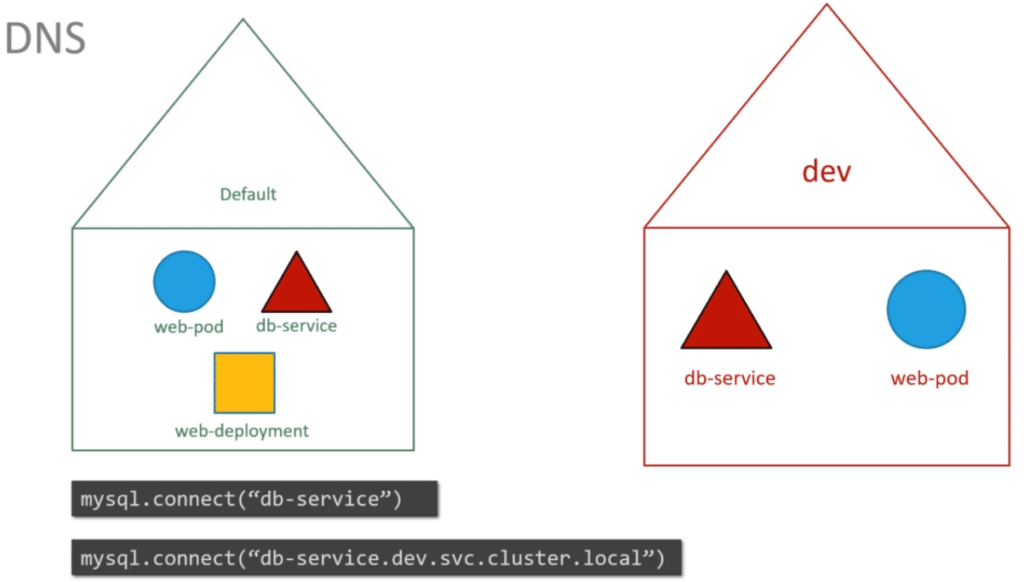
When the service is created a DNS entry is added automatically in the format of “dev.svc.cluster.local”. Here cluster.local is the default domain name of the Kubernetes cluster. svc is the sub domain of the service. dev is the Namespace.
When you run the command “kubectl get pods”, it will only lists the PODs in the default Namespace. To list PODs in the another Namespace you need to run following command
> kubectl get pods --namespace=kube-system
When you create the POD definition, the POD is created in the default Namespace. To create POD in the another Namespace you need to run following command
> kubectl create -f pod-definition.yml --namespace=dev
You can also mention namespace in pod definition file under metadata section
apiVersion: v1
kind: Pod
metadata:
  name: myapp-pod
  namespace: dev
  labels:
    app: myapp

spec:
  containers:
    - name: nginx-container
      image: nginx
Create Namespace
apiVersion: v1
kind: NameSpace
metadata:
  name: dev
  namespace: dev
> kubectl create -f namespace-dev.yml
namespace/dev created
or you can use following command to create namespace
> kubectl create namespace dev
namespace/dev created
Selecting Namespace by Setting the Context
If you want to avoid providing the same namespace for each of your commands, you can change the default namespace that commands will apply to by configuring your kubectl context. This will modify the namespace that actions will apply to when that context is active.
To list your context configuration details, type:
> kubectl config get-contexts
CURRENT   NAME      CLUSTER   AUTHINFO   NAMESPACE
*         Default   Default   Default
The above indicates that we have a single context called Default that is being used. No namespace is specified by the context, so the default namespace applies.
To change the namespace used by that context to our dev Namespace, we can type:
> kubectl config set-context $(kubectl config current-context) --namespace=dev
To view PODs in all NameSpaces
> kubectl get pods --all-namespaces